 The Source File Search feature provides an extremely fast search of
source on the server. Searching a member filter in the Remote Systems
Explorer with iSphere Source File Search is about 60 times faster than
searching with the original RSE Search. The first time after an IPL,
iSphere Source File Search may take a little longer, but you should see
the improvement in subsequent runs.
The Source File Search feature provides an extremely fast search of
source on the server. Searching a member filter in the Remote Systems
Explorer with iSphere Source File Search is about 60 times faster than
searching with the original RSE Search. The first time after an IPL,
iSphere Source File Search may take a little longer, but you should see
the improvement in subsequent runs.
To search source files on a server:
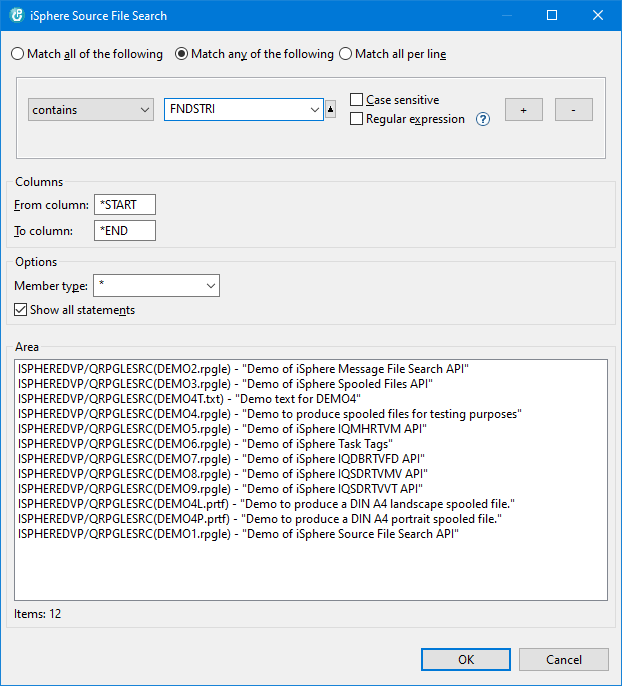
The match options are:
| Match all of the following | - | The source member is added to the result view, when all conditions are met for the source member. |
| Match any of the following | - | The source member is added to the result view, when one or more conditions are met for the source member. |
| Match all per line | - | The source line is added to the result view, when all conditions for a single source line are met. |
The available options are:
| Columns | - | Specifies the column range of the source line that is searched for the search argument. |
| Member type | - | Specifies the (*generic*) source type of the members that are included in the search. |
| Show all statements | - | Specifies whether all matching records of a source member are returned. |
| Note: The plug-in uses the IBM regular expression functions, which are less powerful than the Java or GNU regular expression functions. For example look-ahead and look-behind are not supported. |
After the search finishes on the host, the "iSphere Source File Search" view appears:
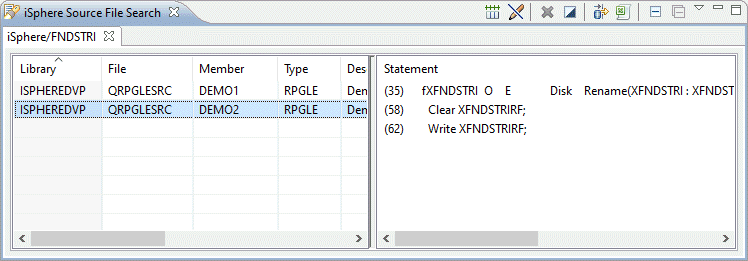
In the left pane click on a member and a preview of the statement(s) containing the search string in the member appears in the right pane. You can change the sort order by clicking on the column head line.
Double click on a member in the left pane to open the the member in the Lpex editor with the cursor at the top of the member. (You can specify whether Lpex opens in edit of browse mode on the preferences page.)
Double click on a line in the right pane to open the the member in the Lpex editor with the cursor at that line. (You can specify whether Lpex opens in edit of browse mode on the preferences page.)
Right click on a member or statement entry to open a context menu.
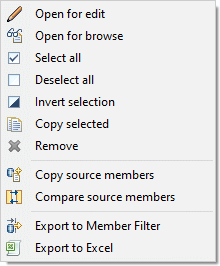
Available menu option are:
 |
- | Starts the Lpex editor for the selected source member. |
 |
- | Starts the Lpex editor in browse mode for the selected source member. |
 |
- | Selects all entries of the member table. |
 |
- | Removes the selection for all entries of the member table. |
 |
- | Inverts the selection of the member table. |
 |
- | Copies the selected items of the source file table to the clipboard. |
 |
- | Removes the selected entry from the member table. |
 |
- | Copies the selected members to a given library and source file. |
 |
- | Open the Compare & Merge editor for the selected members. |
 |
- | Creates a member filter for the selected items of the member frame add adds the filter to the RSE tree. |
 |
- | Exports the selected items of the member frame to Excel. |
The additional icons at the top at of the view and their meanings are:
 |
- | Resets all columns to their default size. |
 |
- | Starts the Lpex editor in browse mode when double-clicking a source member. |
|
- | Creates a member filter for the items of the member frame add adds the filter to the RSE tree. |
|
- | Exports the content of the member frame to Excel. |
 |
- | Closes the active tab. |
 |
- | Closes all tabs. |
Use the view menu to save and load search results:
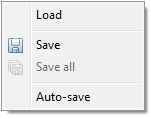
| Load | - | Loads search results from a given file. If the selected file contains more than one search result, the user is asked whether or not he wants to replace the existing tabs. Otherwise a new tab is added to the view. |
| Save | - | Save the selected search result to a given file. |
| Save all | - | Save the content of all search results to a given file. |
| Auto-save | - | Enabled or disables the auto-save feature. When auto-save is enabled, the content of the view is automatically save to a pre-defined file. Check the preferences page for details. |
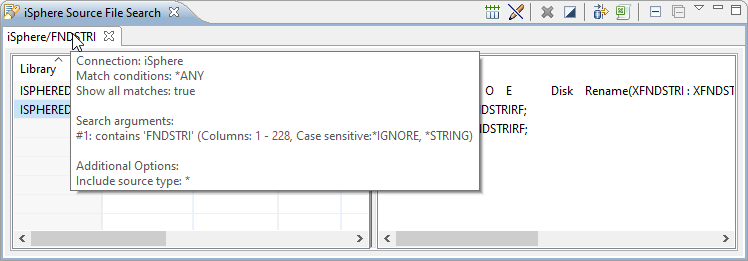
You can hover the tab with the mouse to open a tooltip popup displaying the search options:
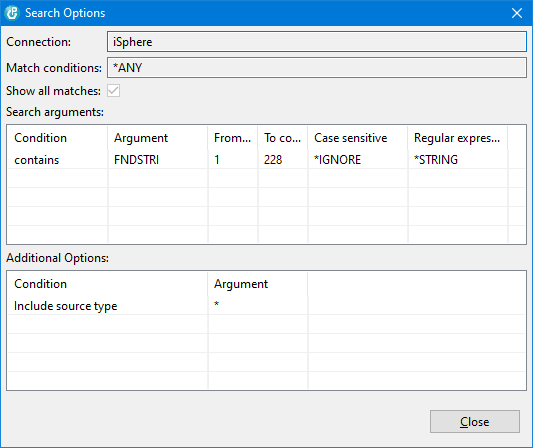
Or you can select Display Search Options from the context menu of the tab to open a window to see the search options:
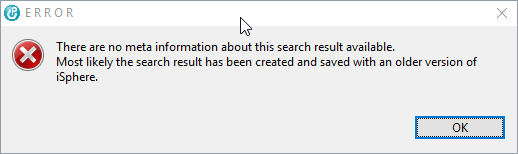
For search results, saved by an older version of iSphere without search options, an error is displayed:
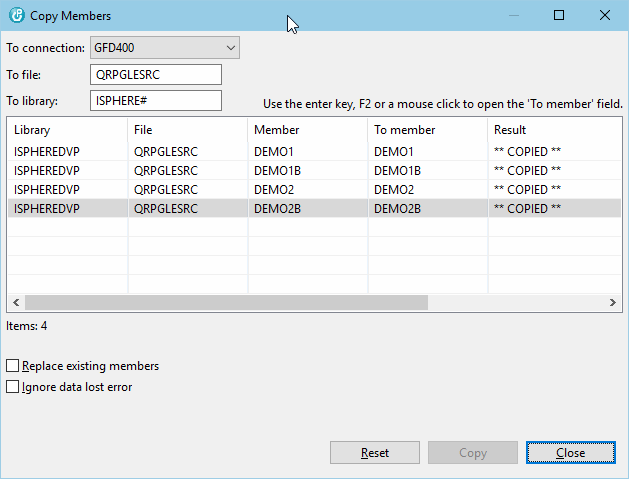
The following windows is displayed when Copy members is selected from the member list window:
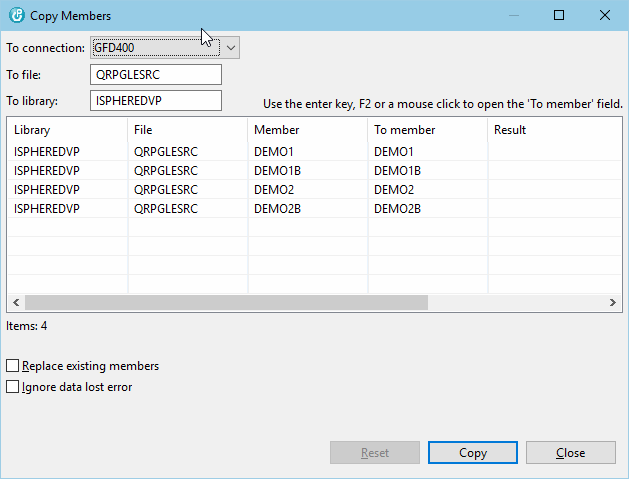
Set the To file and To library values to where you want to copy the displayed members to. Optionally change the To member name.
Press [F2] or [Enter] on the row that you want to change or click into the To member cell that you want to edit to change the member name. Use the [Tab] key to navigate from cell to cell. The [Esc] key cancels editing and the [Enter] key or [F2] changes the value and finish editing of the cell.
When you are done, press the [Copy] button. Before the copy process eventually starts, the specified options are validated. Error messages are displayed in the right most column as well as ** COPIED ** messages at the end of the copy process:
The iSphere Source File Search can also be started from the Eclipse Search Pop-up window. Use CTRL-I,S or the "Search" menu, option "Search..." to open the iSphere Source File Search dialog.
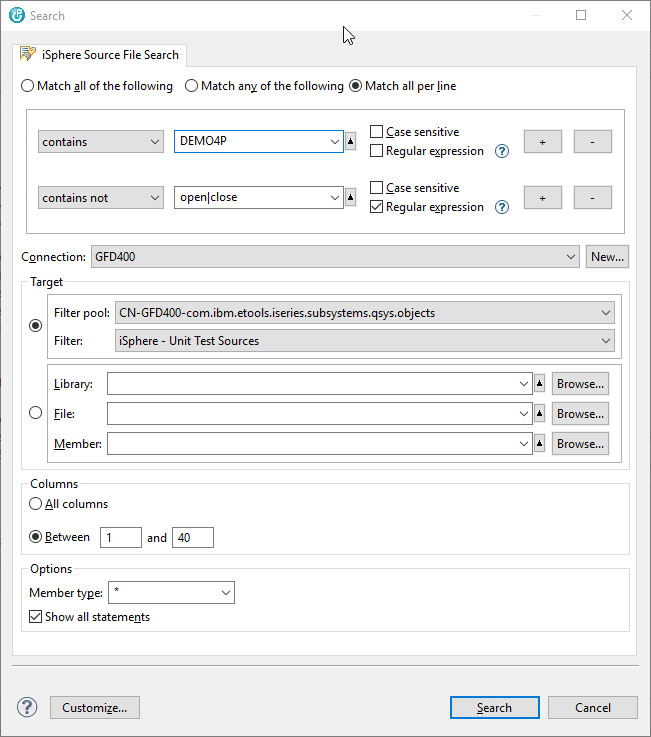
The additional options are:
| Connection | - | Specifies the connection that is used to connect to the host. |
| Target: Filter | - | Specifies the filter whose entries are searched. |
| Target: Member | - | Specifies the library, source file and member(s) that are searched. Each item accepts *generic* strings. |
You can either use the filter target or the member target. The radio buttons next to the targets indicate the target that is used.