 The Journal Explorer is a set of views bound to a perspective, used for exploring IBM i journal
entries that have been exported to an output file. The following types of output files of the
DSPJRN command are supported:
The Journal Explorer is a set of views bound to a perspective, used for exploring IBM i journal
entries that have been exported to an output file. The following types of output files of the
DSPJRN command are supported:
You can also launch the iSphere Journal Explorer from the context menu of a physical file or a journal.
The Journal Explorer can display journal entries of journaled objects of the following object types:
| Notice: Your IBM i must be at least a release level V5R4M0 to retrieve journal entries from a journal receiver. However exploring an output file is possible at lower releases. |
You can open the Journal Explorer perspective from 'Window -> Open Perspective -> Other...'. The perspective looks like that:
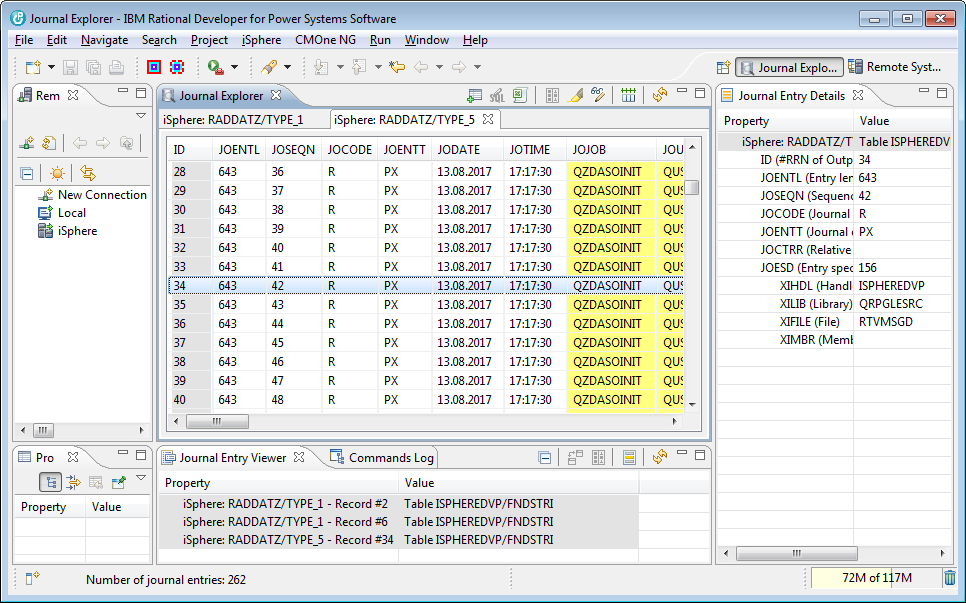
The columns can be colored on the preferences page of the Journal Explorer. By default the #RRN and the job and object related columns are color-coded.
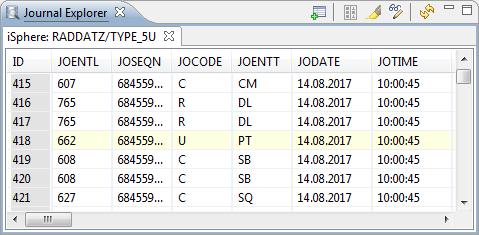
The Journal Explorer view displays the journal entries of all open output files. Output files are opened in individual tabs. The properties of a selected journal entry are displayed in the Journal Entry Details view, which by default is at the right hand side of the Journal Explorer view.
The following actions are available:
 | Opens an output file created by the DSPJRN command. | |
 | Opens an SQL editor for editing the SQL WHERE clause for filtering the journal entries. (Local operation that does not contact the host system.) | |
 | Exports all journal entries to Excel. | |
 | Compares the selected journal entries and shows the result side by side. | |
 | Highlights user-created journal entries. | |
 | Opens a dialog for configuring the parsers. | |
 | Resets all columns to their default size. | |
 | Reloads the journal entries form the output file or the journal receiver. (Remote operation that reloads the data from the host.) |
The available options of the view menu are:
| Open | Loads the journal entries from a Json file that was created with the Save option. | |
| Save | Saves all journal entries to a Json file on the PC. |
Output files of *TYPE1 or *TYPE2 are created like this:
For output files of *TYPE3 use the following command:
| Notice: Please check your journal attributes, if fields are unexpectedly empty. You
need to specify parameter FIXLENDTA when creating the journal if you want to see fields
like Program library name, System sequence number, Remote address,
Thread identifier, Logical unit of work or Transaction identifier. Use
to change the journal afterwards: CHGJRN ... JRNRCV(*GEN) FIXLENDTA(*JOB *USR *PGM *PGMLIB *SYSSEQ *RMTADR *THD *LUW *XID) |
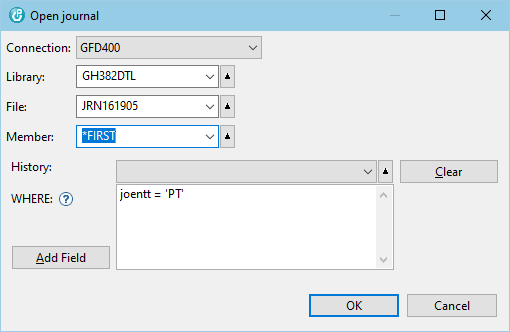
Click the Open journal output file button at the top of the Journal Explorer view:
Fill in the library, file and member names and click the [OK] button.
The following actions are available:
| Connection | Specifies the connection the output file is loaded from. | |
| Library | Specifies the name of the output file. | |
| File | Specifies the name of the library where the output file is stored. | |
| Member | Specifies the name of the member of the output file. | |
| WHERE | Specifies a SQL WHERE clause to select a subset of the records of the output file. |
| Notice: The SQL WHERE clause specified here is applied to the records of the output file created by the DSPJRN command. It must be specified in IBM i SQL syntax. |
Use menu option iSphere -> DisplayJournal Entries... from the main menu to specify the journal or object, whose journal entries are displayed:
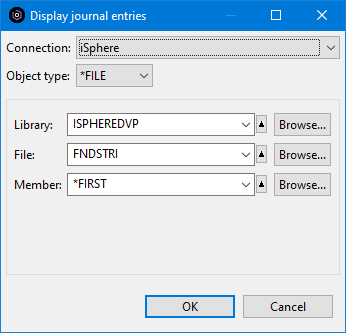
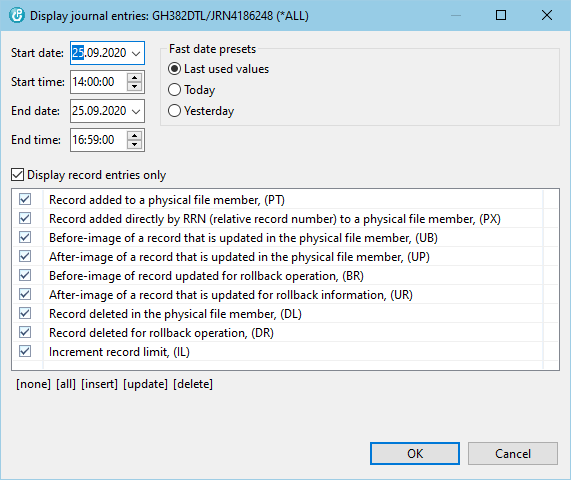
Right-click one or more journaled physical file(s) in the Remote System Explorer perspective and select Display Journal Entries.... Select the range of journal entries that you want to explore and click the [OK] button. The journal entries are retrieved by the QjoRetrieveJournalEntries API.
The following actions are available:
| Start date | Specifies the date of the first journal entry being retrieved. | |
| Start time | Specifies the time of the first journal entry being retrieved. | |
| End date | Specifies the creation date of the last journal entry being retrieved. | |
| End time | Specifies the creation time of the last journal entry being retrieved. | |
| Fast date presets | Click one of the available options to quickly select a time span. | |
| Display record entries only | Specifies whether to retrieve only journal entries of record level operations. | |
| List of record entry types | Specifies the journal entry types that are retrieved. | |
| Label: [none] | Deselects all selected journal entry types. | |
| Label: [all] | Selects all journal entry types. | |
| Label: [insert] | Selects all journal entry types that are related to 'write' operations. Use the CTRL or ALT key or double-click to negate the operation. | |
| Label: [update] | Selects all journal entry types that are related to 'update' operations. Use the CTRL or ALT key or double-click to negate the operation. | |
| Label: [delete] | Selects all journal entry types that are related to 'delete' operations. Use the CTRL or ALT key or double-click to negate the operation. |
The Journal Explorer opens multiple tabs when it is started for a group of selected files. The files are grouped by Connection and Journal.
| One file selected | Two or more files selected |
|---|---|
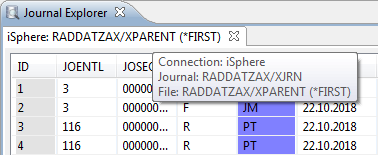 | 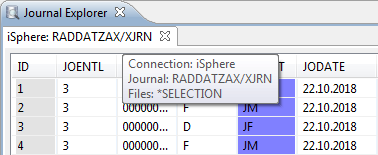 |
| Tab shows the name of the selected file. | Tab shows the name of the associated journal. |
Loading journal entries of a journal basically works the same as loading journal entries of a file.
Right-click one or more journals in the Remote System Explorer perspective and select Display Journal Entries.... Select the range of journal entries that you want to explore and click the [OK] button.
Click the Edit SQL button at the top of the Journal Explorer view to open the SQL editor:
The SQL Editor is used to enter a SQL WHERE condition for selecting a subset of the available journal entries. Enter the WHERE condition and then click the Execute button or press Ctrl+Enter to execute the query. Refer to the SQL Reference to see the list of available functions.
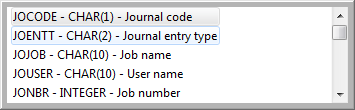
By default you can use certain JO* fields for your query. Use content assist to see the available fields. In order to use record specific fields in your query, you need to select the table that contains the records you want to filter for in the Table name combo box. It is also possible to combine JO* and record specific fields.
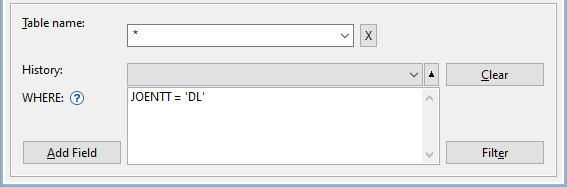
Use Ctrl+SPACE for content assistance.
The following actions are available:
| Ctrl+SPACE | - | Content assist. |
| Add Field | - | Content assist. |
| Clear | - | Clears the where condition. |
| Ctrl+ENTER | - | See: Filter |
| Filter | - | Executes the query with the current where condition to create a subsetted list of the downloaded journal entries. |
| Notice: Filtering journal entries is a local task, which does not reload the journal entries from the host. |
| Notice: The SQL WHERE clause is applied to the records that have been downloaded to the PC. It must be specified in the iSphere SQL syntax, which in most cases matches the IBM i SQL syntax. |
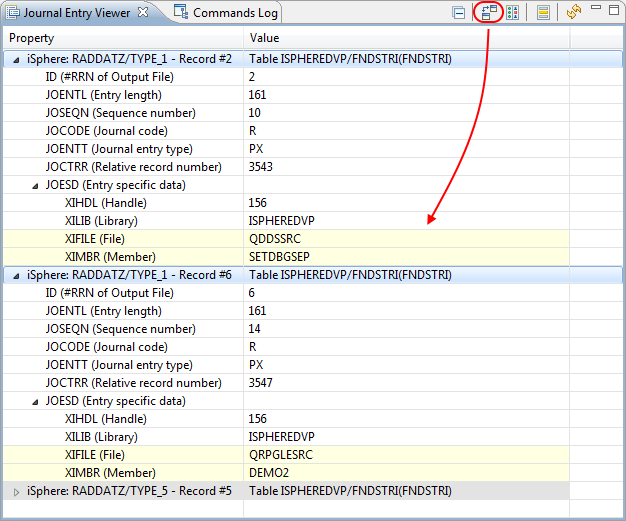
The Journal Entry Details view displays the details of a journal entry, selected from the Journal Explorer or Journal Entry Viewer view.
The Journal Entry Viewer displays the selected journal entries of all open journal output files. It can be used as a workbench for analyzing journal entries.
The following actions are available:
 | Collapses the whole tree. | |
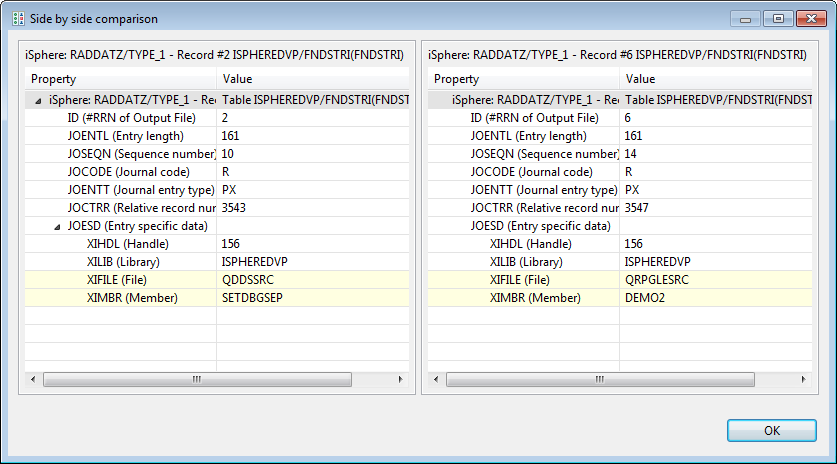
 | Compares the selected journal entries. Properties that are different are highlighted. | |
| Compares the selected journal entries and shows the result side by side. | |
 | Display changed fields only. | |
| Re-parses the journal entries. |
Example of highlighted user-created journal entries:
Example of compared journal entries:
Example of a side-by-side compare: